
Menu
M-SHIFT STUDIO GUIDE
Know your tools.
Understand the workflow.
A practical overview of DME configuration, Premium DME and SMG tuning, Ultra firmware, diagnostics and backups.
01 / CONNECTION
Connect and identify.
Use a high-quality K+DCAN cable with EdiabasLib firmware. Switch the ignition on, keep HVAC and headlights off and maintain stable battery voltage. Select the COM port and identify the connected DME.
The Info screen shows licence status and connected DME information, with Licence Activation, Import Licence and Check for Updates controls. Premium and Ultra require their respective VIN-bound licences. An imported licence must still be appropriate for the vehicle; it is not a licence transfer to another VIN.
Connection and licence controls
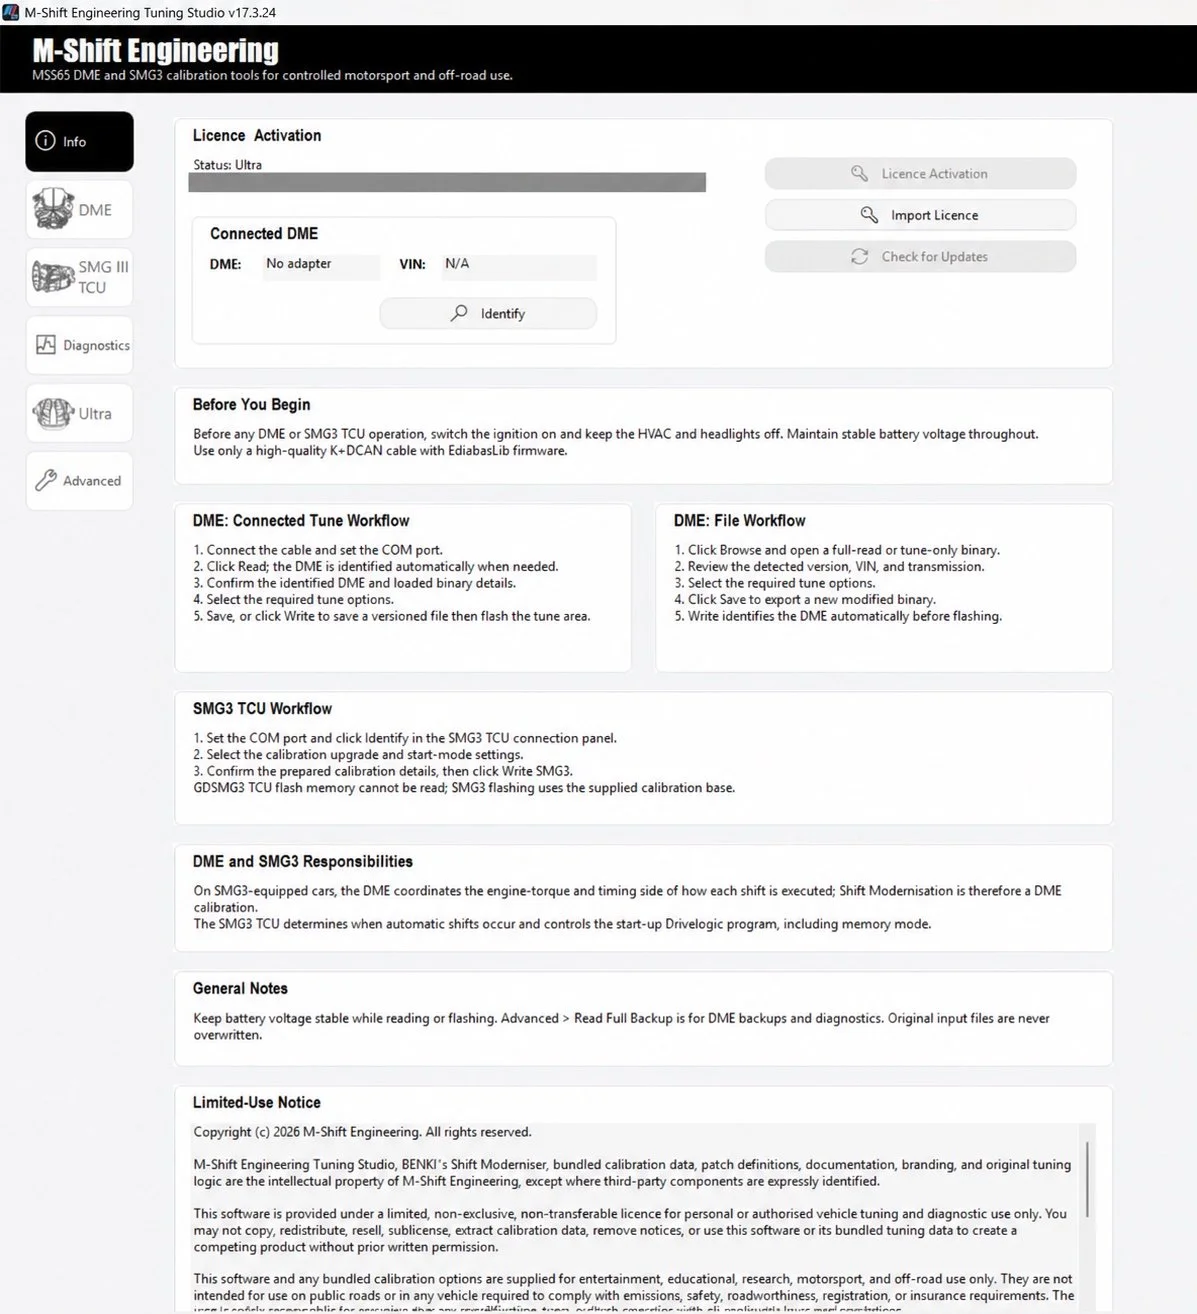
- Licence controls. Activate or import the appropriate VIN-bound licence.
- Identify. Identify the connected DME before proceeding.
Open full screenshot — scroll to inspect
02 / DME
Customise your Premium tune.
Premium lets you customise your tune using Studio’s supported options. Read the calibration from your car or open an existing file, choose the settings for your build, then save and write your customised tune.
Read from the connected car
- Connect the interface and select the COM port.
- Select Read; Studio identifies the DME automatically when needed.
- Review the identified DME and loaded binary details.
- Select the compatible tune options.
- Save a modified file, or use Write to save a versioned file and flash the tune area.
Work from an existing file
Use Browse to open a full-read or tune-only binary. Review its version, VIN and transmission, select supported options and use Save to export a modified binary. Studio identifies the DME before writing. Original input files are not overwritten.
Configuration controls
The standard DME screen includes VMAX, cold-start and exhaust-system options; 1,500/1,900 rpm start-up bark; stock/599/S65 injectors; 8,250/8,400/8,500 rpm selections; M-Drive defaults; and oil-service interval adjustment for supported MSS65 160E binaries. Controls are subject to compatibility and licence checks.
Premium adds BENIKI’s Shift Moderniser and Stock, Stage 1 or Stage 2 Catless power selections. Use settings appropriate for the fitted hardware and stated motorsport/off-road application.
Standard DME and Premium tuning
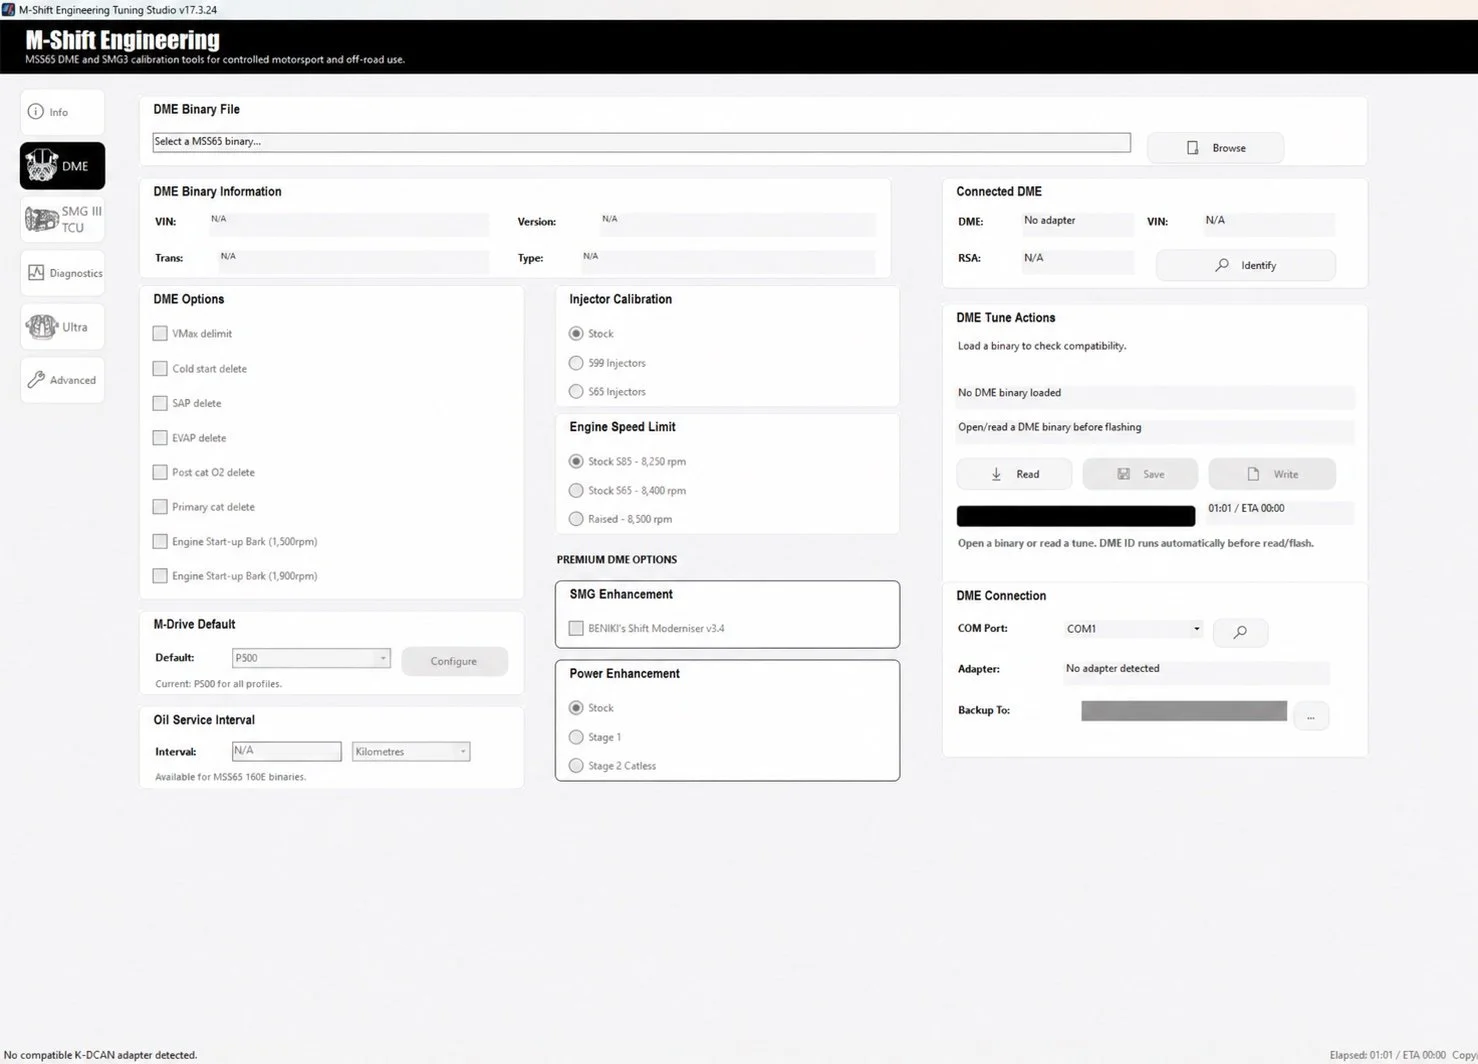
- Read / Save / Write. Read a supported standard calibration, customise the available options, then save and write your tune.
- Premium options. Shift Moderniser and power-enhancement controls.
- COM port. Choose the port for your compatible interface.
Open full screenshot — scroll to inspect
03 / SMG III
Tune the engine and transmission together.
The SMG tune is intended to be used with the M-Shift Premium DME tune. The two tunes work together. BENIKI’s Shift Moderniser adjusts the DME’s coordination of engine torque and shift timing. The SMG III calibration controls automatic-shift behaviour and the starting Drivelogic programme.
Select the COM port and Identify in the SMG III panel. Choose the calibration and starting Drivelogic settings, review the prepared calibration details, then follow Write SMG3.
Stock Euro and modernised calibration choices are described in Studio. The modernised calibration starts in first gear in D1 and improves low-speed drivability. Start-mode controls configure automatic/manual starting programmes, including supported memory modes.
SMG is a different workflow
GDSMG3 TCU flash memory cannot be read through this workflow. Studio prepares the flash from a supplied calibration base. Do not expect the DME read-and-backup procedure to create a copy of the existing SMG firmware.
SMG III calibration and start mode
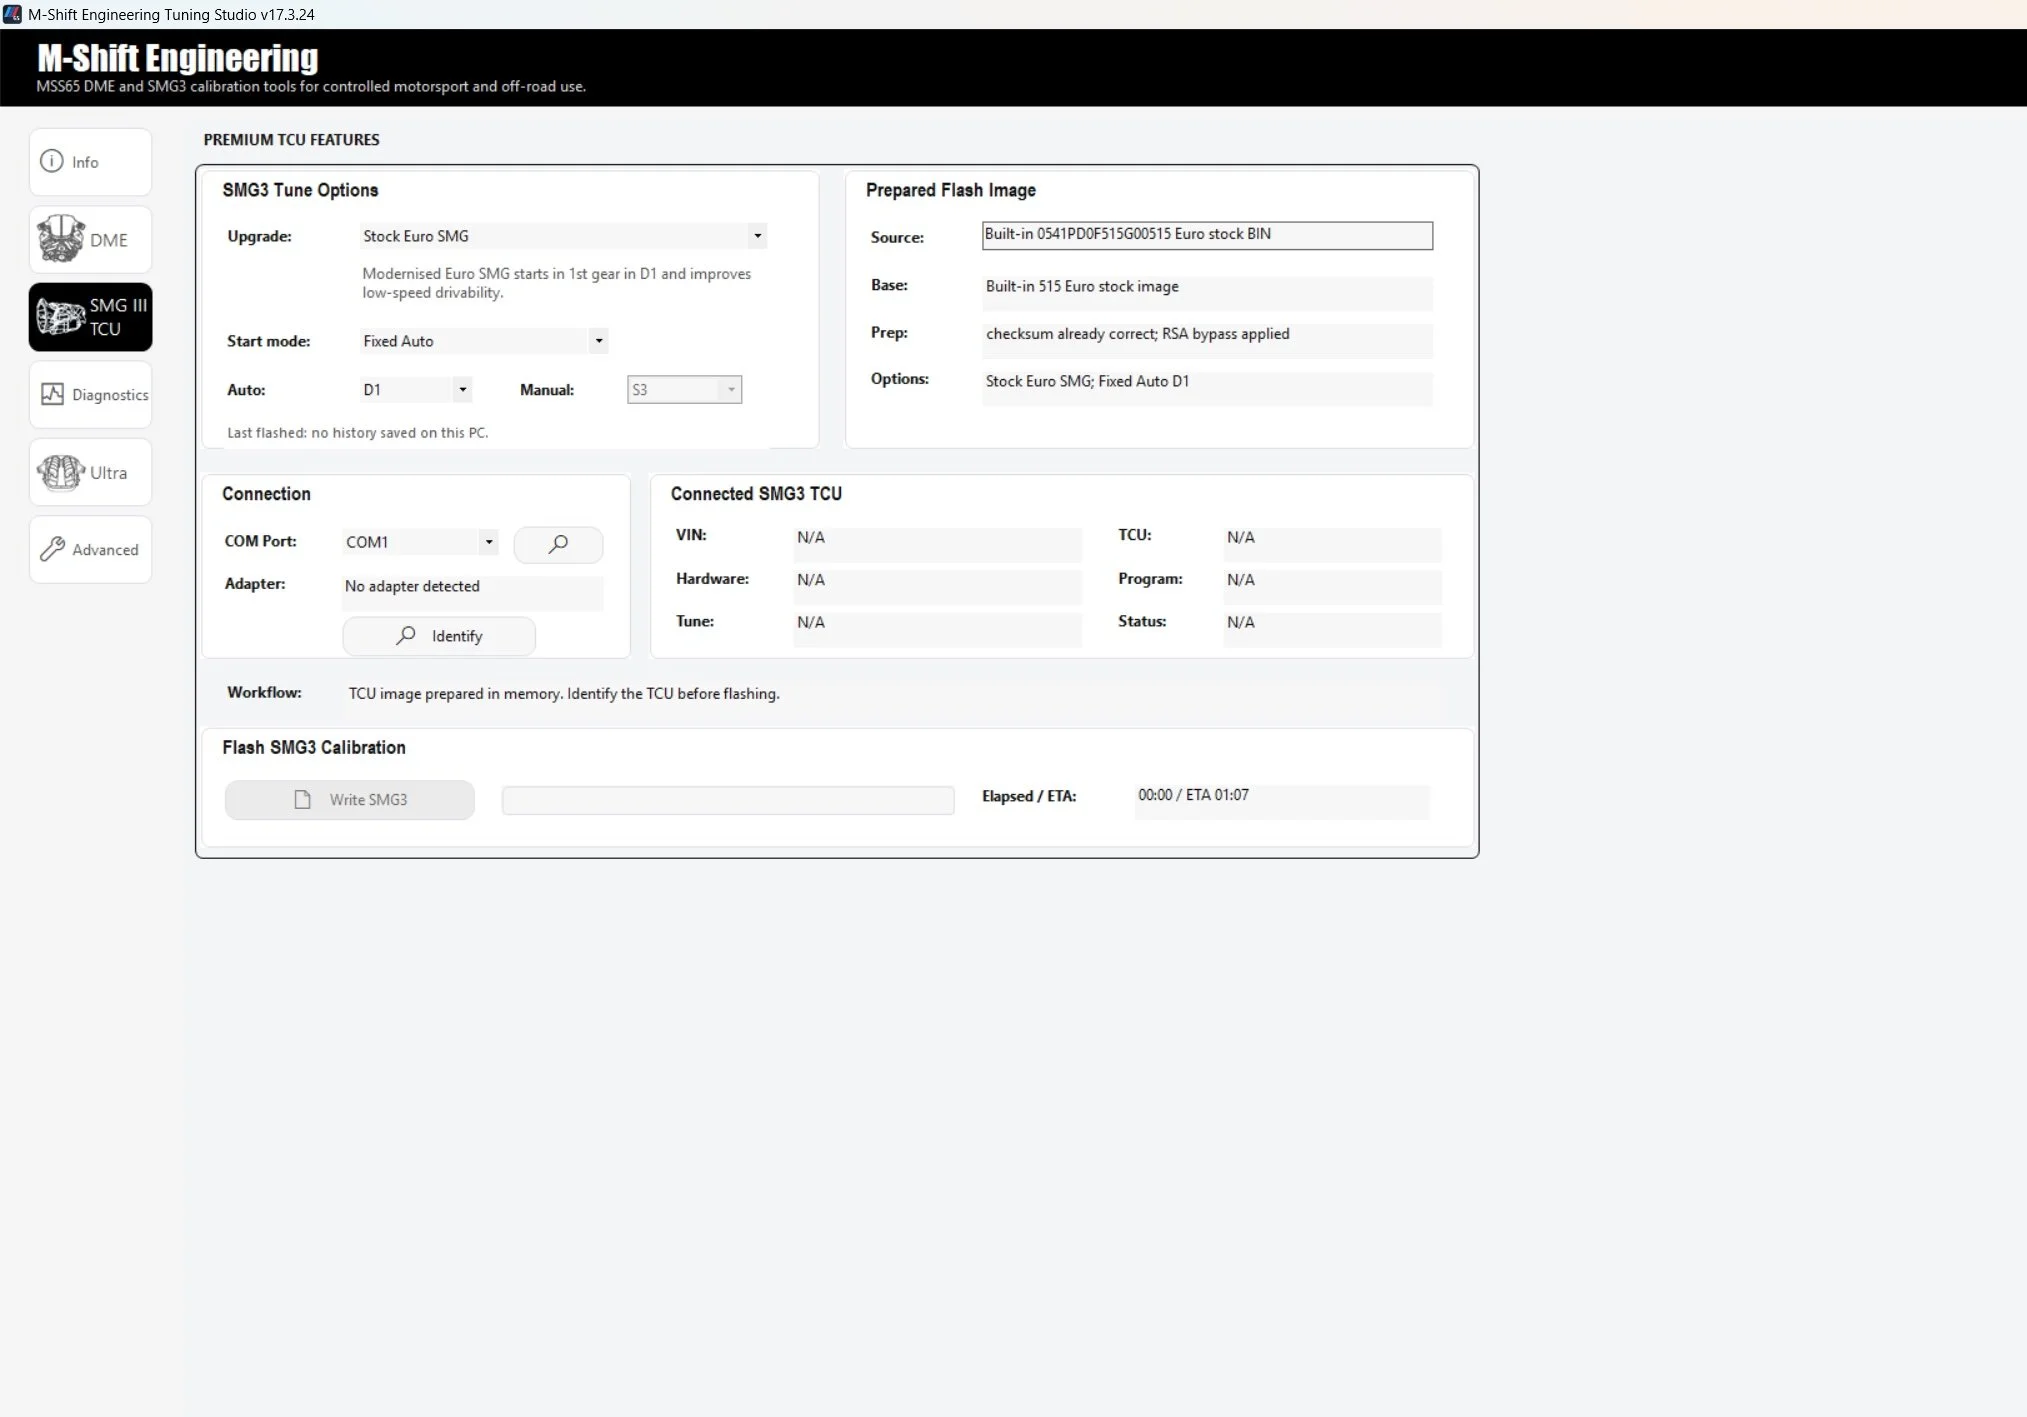
- Calibration. Choose the supported SMG calibration for use with the Premium DME tune.
- Start mode. Configure the starting Drivelogic programme.
- Write SMG3. Review the prepared image and identify the TCU before writing.
Open full screenshot — scroll to inspect
04 / ULTRA
Install firmware, then configure.
Ultra uses a write-only tuning workflow: there is no need to read the tune first. Choose your supported configuration in Studio and write it to the DME.
- Identify the DME and confirm MSS65 hardware, VIN and installed programme.
- Select the appropriate transmission and EWS configuration for your build.
- Review the prerequisite and release-compatibility checks.
- Install and verify the Ultra firmware using the Ultra workflow.
After installation, open the Ultra menu and access the Ultra tuning page to make engine tune changes. Configure supported injector calibration, engine-speed limit, oil-service interval, M-Drive defaults, transmission and DCT final-drive ratio, then select Write. Cold-start delete is included.
A normal tune write does not install Ultra firmware. Configuration changes are separate from the initial installation. A verified VIN-bound Ultra licence is required.
Ultra firmware: installation and removal
Installation takes approximately 20 minutes. To remove the custom firmware, you must use M-Shift Studio. Do not overwrite it directly with standard DME firmware: this risks bricking the DME.
Allow approximately 20 minutes for installation planning; the actual estimate depends on the required stages and is shown by Studio. Use the dedicated Uninstall Ultra workflow for removal. Do not assume another full-write or stock-restore action is an interchangeable removal method.
For DCT conversions, the supplied transmission calibration still requires the separate DCT Quick Flash licence. Studio’s DCT configuration controls do not replace that flashing requirement.
Ultra firmware installation
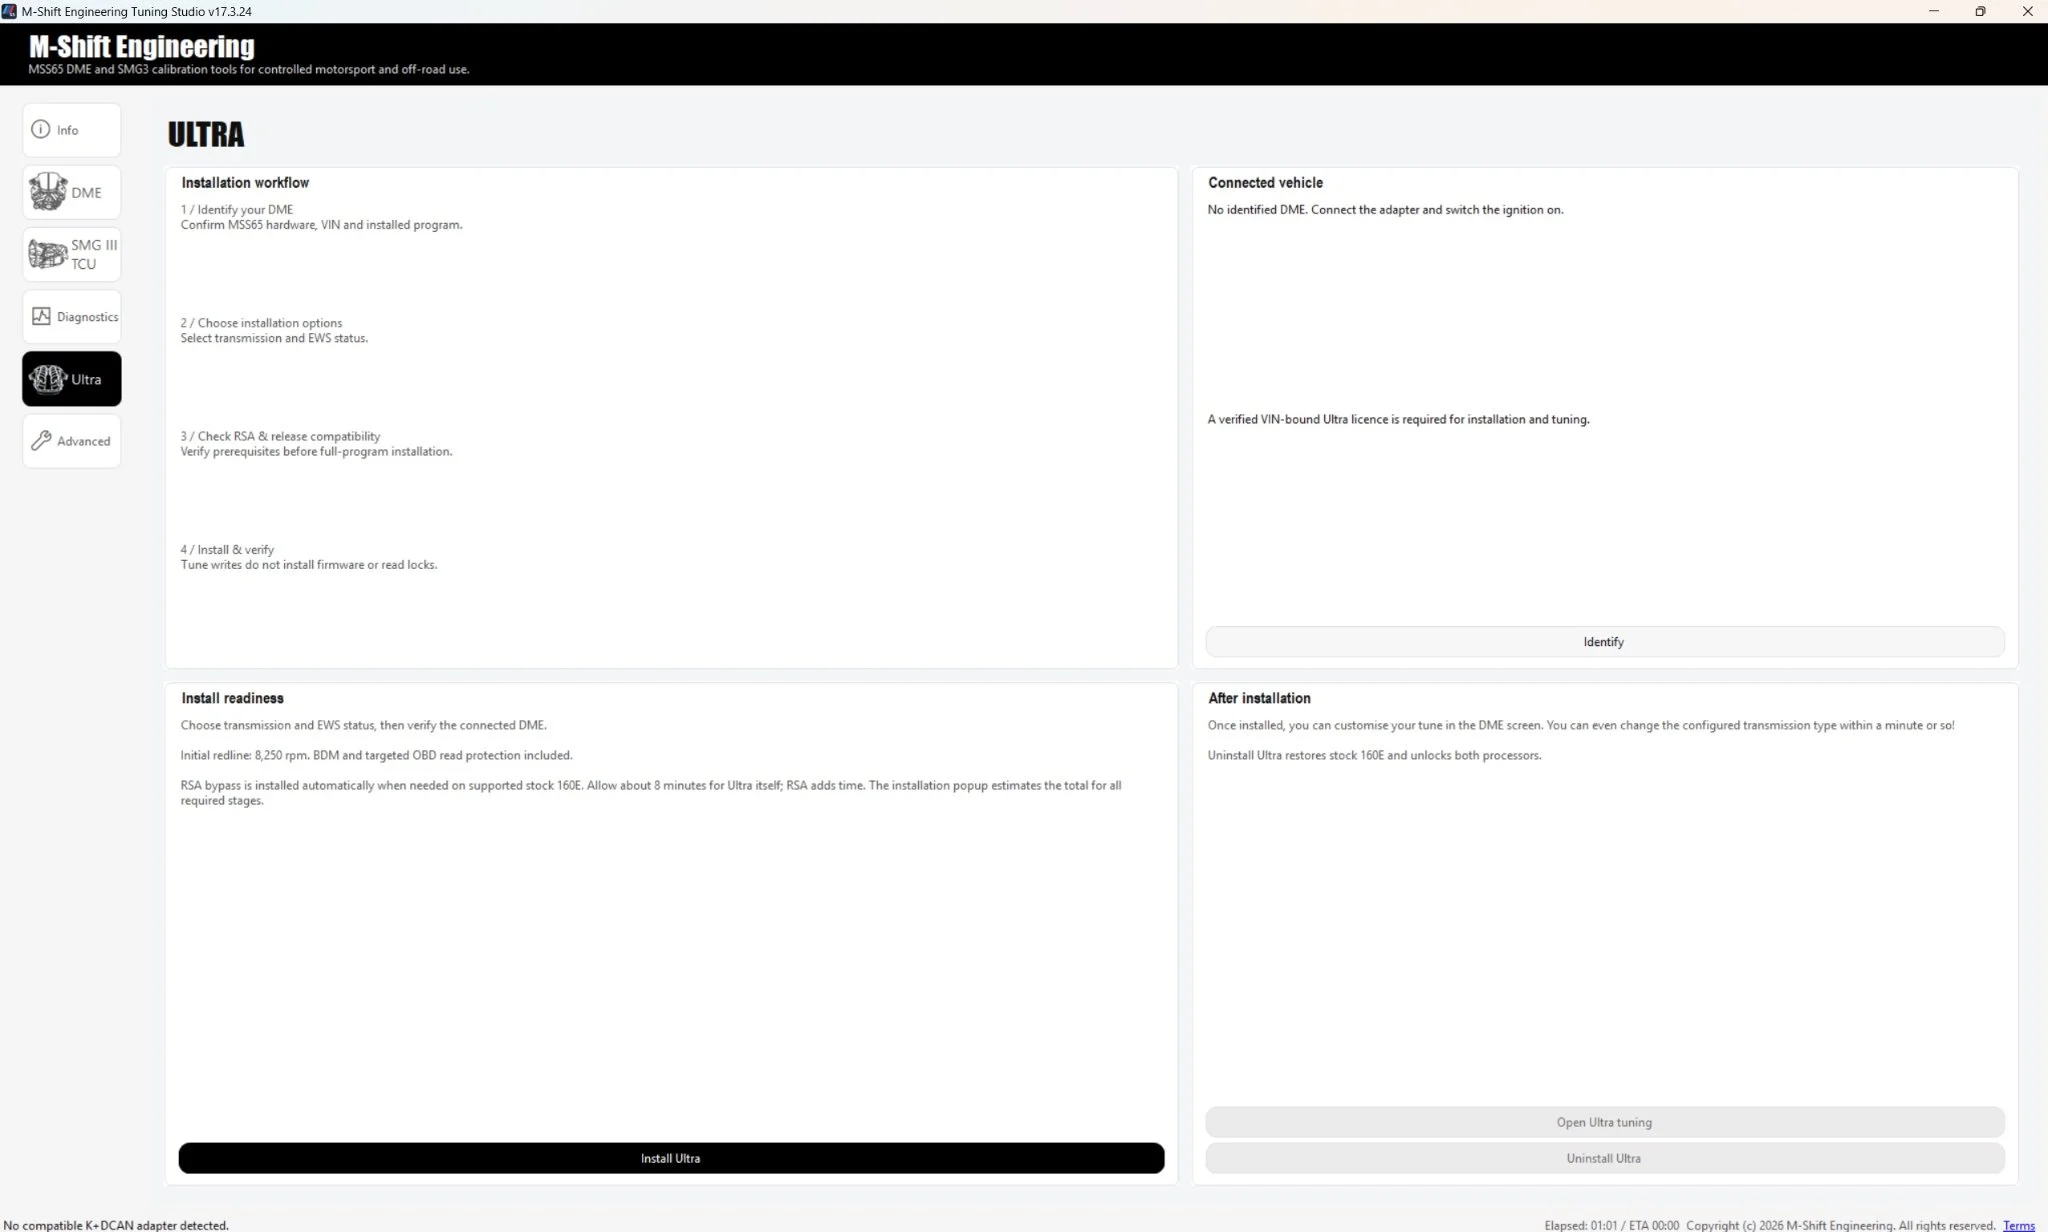
- Installation workflow. Identify, choose the appropriate configuration, check prerequisites, then install.
- Installation readiness. Review Studio’s checks and estimated duration.
- Uninstall Ultra. Use this dedicated workflow for removal.
Open full screenshot — scroll to inspect
Ultra tuning page — accessed from the Ultra menu
Open the Ultra menu, then access the Ultra tuning page shown below. The highlighted DME icon also appears on the Premium page; it does not identify which tuning page you are using.
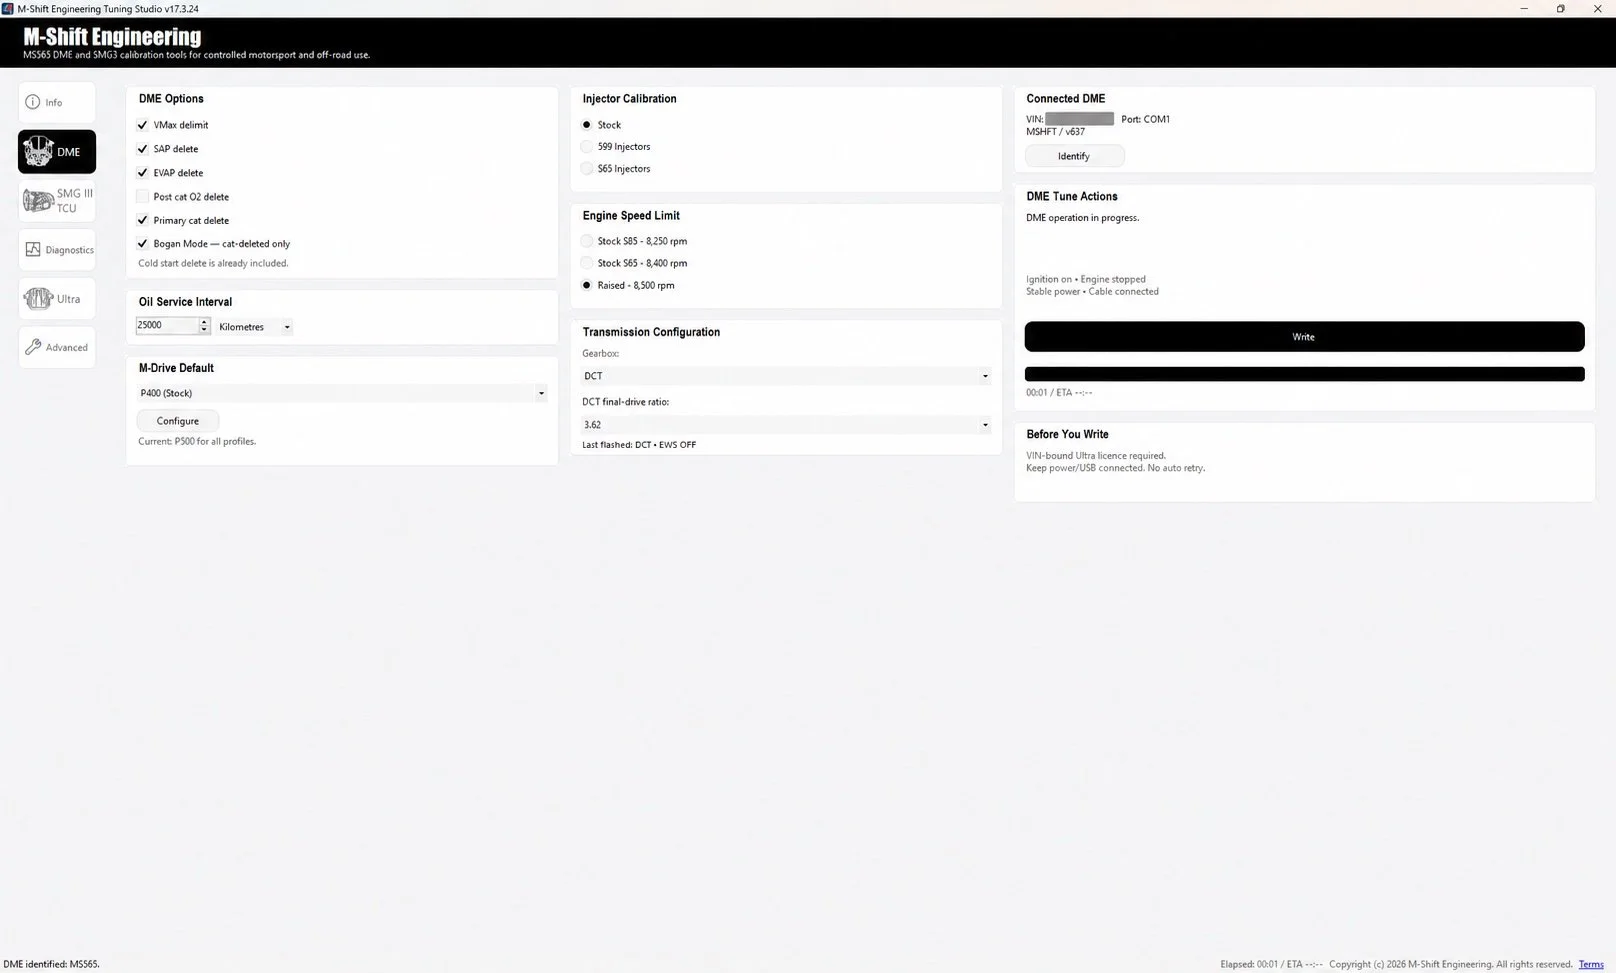
- Transmission settings. Configure the supported transmission and DCT final-drive ratio.
- Injector and engine-speed settings. Match supported options to the actual hardware.
- Write. Write your selected Ultra configuration to the DME.
- Highlighted DME icon. The DME icon is highlighted on both Premium and Ultra tuning pages. Access this Ultra page through the Ultra menu.
Open full screenshot — scroll to inspect
05 / DIAGNOSTICS
Read values with the right context.
Diagnostics includes Faults, Adaptations, System Tests, Longitudinal Sensor and RAM Dump sections. Available functions depend on the installed firmware and vehicle state.
- Vehicle faults: Read fault memory from responding modules, then clear faults for a selected module or use Clear all faults. Only responding modules are shown; an absent module is not evidence that it is fault-free.
- System tests: Run LLS (idle actuator), throttle and VANOS tests, with a Stop test control. Results use green for within range / passed, amber for review needed and red for outside range / fault. A communicating MSS65 in normal operation is required.
- Longitudinal sensor: View live acceleration, learned offset and sensor voltage for DCT-swapped and manual cars, and calibrate the sensor. Follow the on-screen requirements: stationary on level ground, engine off, ignition on and stable power. Stop live readout before calibration; refresh a retained sample if it is older than 30 seconds.
- DME RAM snapshot: Capture 32 KiB from INJ and 32 KiB from IGN, with progress and a Cancel RAM read control. The processors remain running and the captures are sequential. This captures working RAM, not firmware or calibration, and is not a DME backup.
The Adaptations screen reads firmware-specific learned values and filling models. It has a separate Clear all DME adaptations action, with a separate confirmation. Reading a report does not reset adaptations.
- Learned idle and VANOS values provide diagnostic context.
- Per-cylinder learned knock adaptations are not instantaneous knock retard or proof of live protection.
- Learned filling-model outputs must not be interpreted as conventional fuel trims.
- An acknowledged read or “OKAY” response is not a verdict on engine health.
Studio provides saved logs and a support-sharing selection for diagnostic captures. Include the exact fault, vehicle configuration and steps that led to it when asking for support.
Ultra retains full knock control, adaptation and misfire detection; the diagnostic report is a view of selected learned values, not a live verification of all protection functions.
Diagnostic adaptations and saved captures
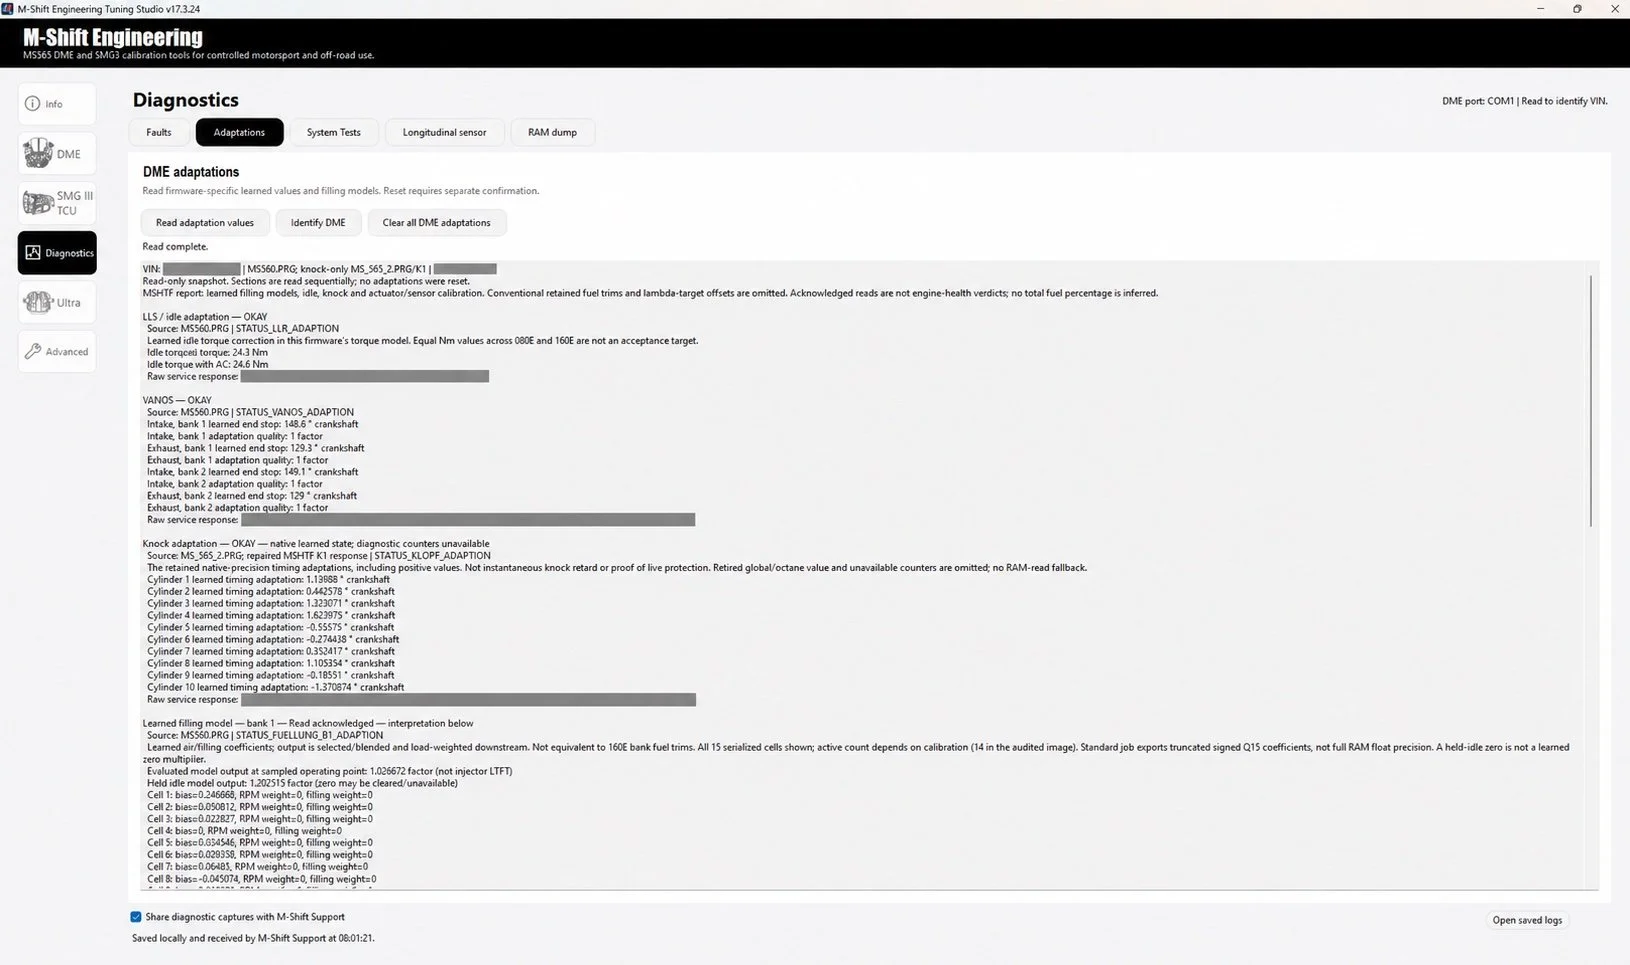
- Read and reset are separate. Read learned values; resetting adaptations is a separate operation.
- Support sharing. Check the diagnostic-capture sharing selection.
- Saved logs. Use saved captures when discussing a fault with support.
Open full screenshot — scroll to inspect
06 / ADVANCED
Backups and restoration.
For supported standard DME firmware, Advanced contains Read Full and Load Full Read controls, alongside Write Full, Reset, RSA Bypass and EWS Del controls whose availability depends on the current state. A whole-image stock-restore section also provides a stock-package selector.
A full DME backup is different from the everyday tune-area read/write workflow. Keep original files and identify the connected hardware before using a restore operation. Follow Studio’s compatibility checks and instructions; visible controls are not a guarantee that an operation is available for every firmware or licence.
Ultra removal remains separate
Remove Ultra through M-Shift Studio’s dedicated uninstall workflow. Do not directly overwrite its firmware with a standard image.
If the correct restore package or procedure is unclear, contact M-Shift before writing.
Ask about your setup →Advanced DME operations
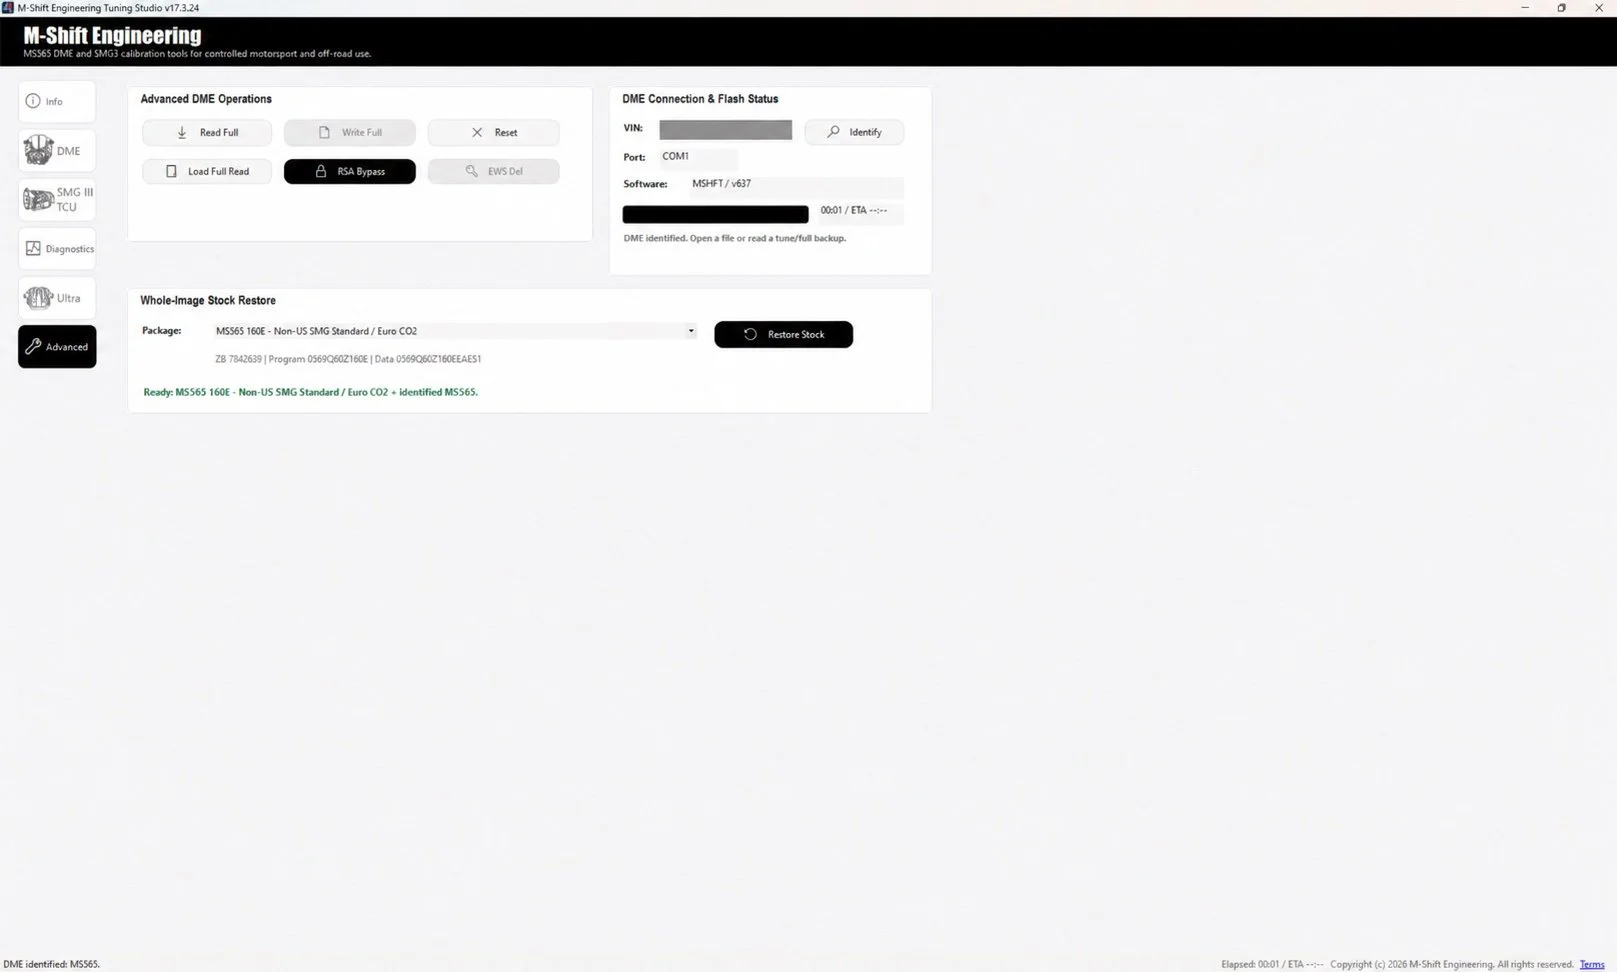
- Full-read controls. Create or load a full backup of supported standard DME firmware.
- Stock restore. Follow the supported restore procedure for your firmware. Remove Ultra using Uninstall Ultra.
Open full screenshot — scroll to inspect